Pages

Tuesday, April 30, 2013

Red Velvet Cookies with White Chocolate Chips


It's... drumroll, please... birthday cookie time again!

Tomorrow is my dad's birthday (Happy Birthday Dad!), and he actually emailed me a recipe he wanted me to try. Which was awesome, considering the first time I asked he replied "Something with chocolate". Umm, not really narrowing the field with that response Dad :)

I liked making these cookies, mainly because you don't need to use as much red food coloring as you would for cupcakes. For comparison, I use 3 bottles of red food coloring when I make my cupcakes, and I used 1½ teaspoons for these cookies. I was happy on that note.

The hubby and I did split one of these cookies, before I shipped them off. I was going to send them all, when the hubby reminded me that a professional chef never sends a product without first tasting it. Touche. I think he just wanted a cookie. These turned out thick and chewy, and delightfully moist. Yum!


Ingredients:

½ cup butter, softened

1 cup sugar
1 large egg, room temp
1 tsp cider vinegar
1 tsp vanilla
1½ tsp red food color
1½ cups flour
2½ tbsp cocoa
1 tsp cornstarch
¾ tsp baking powder
¼ tsp salt
¾ cup white chocolate chips

Directions:


1. Preheat oven to 375º. Line a cookie sheet with parchment paper, and spray lightly with cooking spray.

2. In a large bowl, cream butter and sugar. Mix 3-4 minutes, or until butter mixture is light and fluffy. Add egg to mixture, combine well. Add vinegar, vanilla, and red food color. Mix until well combined.
3. In a separate bowl, whisk together the flour through salt. Add flour mixture to butter mixture in 2 additions, mixing well between additions. 
4. Fold in white chocolate chips.
5. Roll dough into ping-pong size balls, and place 2 inches apart on cookie sheet. Bake in preheated oven 8-11 minutes, or until edges are browned. Cool on cookie sheet 5 minutes, then remove to a cooling rack.


Recipe adapted from Six Sisters Stuff

Monday, April 29, 2013

Open Season For... Razors?!

Garnier Moisture Rescue Gel, Sally Hansen Insta-Dry Nail Polish, Quaker Oatmeal Squares, Crest Toothpaste, Bounty Basic Paper Towels, Peanut Butter M&M's, Venus Razors.
Being a woman in summer means upping your stakes in the battle against basically any kind of body hair. This also means razors are coming and going a lot faster than they would at any other time of the year, and they are freakin' expensive! I found an amazing deal at Rite Aid this weekend, though. 3-packs of Venus razors normally retail for $11.99. They were on sale for $7.49, and part of a promotion where if you spend $30, you get back $10. I also had in my hot, little hands a "Buy 1, Get 1 Free" coupon for Venus razors. I ended up getting 4 packs of razors- plus 1 roll of Bounty Paper Towels- for $9.92 (I also had $6 in rewards from last week). 4 packs of razors for less than the price of 1? Yes, please! Here's the breakdown for the rest of the haul:

CVS

Peanut Butter M&M's, $0.99
-used a $0.99 Mars candy CVS store coupon
Garnier Moisture Rescue Gel, $8.99 (Buy $15 in Garnier, Receive $5 in ECB's)
-used a $5 off 2 Garnier moisturizers coupon
Sally Hansen Insta-Dry Nail Polish, $5.79 (Spend $10 in Sally Hansen, Receive $5 in ECB's)
-used a Buy 1, Get 1 Free Sally Hansen Insta-Dry Nail Polish coupon
Crest, $3.49 (Buy 1, Receive $1 in ECB's)
-used a $1 off Crest toothpaste coupon

-Used $17 in ECB's from last week, paid $6.05 out of pocket, and made $11 in ECB's for next week.

Rite Aid

*Purchases part of "Spend $30 on Select P&G Products, Receive $10 in UP's" promotion*

Venus Razors, $7.49
-used (2) Buy 1, Get 1 Free Venus Razors coupon
Bounty Basic Paper Towels, $0.99
-used a $0.25 Bounty Paper Towels coupon

-Used $6 in UP's from last week, spent $9.92 out of pocket, and made $10 in UP's for next week.

Kroger

Quaker Oatmeal Squares cereal, $1.88
-used (2) $0.75 off Quaker cereal coupons

-Spent $2.26

Total Spent- $18.23 on $92.77 worth of product. Savings of 80%.

Happy Monday! I hope everyone had a great weekend!

Thursday, April 25, 2013

Banana Cake with Vanilla Bean Frosting


I told you I'd be back with more vanilla bean recipes. Well, here I am. Still loving my vanilla beans. My soft, pliable, delightfully aromatic vanilla beans. It has crossed my mind to try eating a vanilla bean. They smell so freakin' amazing, why wouldn't they taste good? But then, I remember the time I tried a sip of vanilla extract. Talk about a wolf in sheep's clothes. So I've refrained.

Has anyone else tried a bite of a vanilla bean? Just curious, that's all :)

It has also crossed my mind that I might purposefully hoard overripe bananas, just so I can put them in baked goods. The jury's still out on that one. What the jury's not still out on is this cake! So moist, fluffy, and delicious. I tweaked my frosting recipe to include vanilla bean, and yum! If you really like frosting, you might want to double the frosting recipe. I'm that weirdo that only likes a little bit of frosting.

I think overripe bananas are going to be making even more appearances on my counter. That's saying something, as I always have an illustrious amount of overripe bananas.

Ingredients:

Cake-
2 tbsp unsalted butter, softened
2/3 cup sugar
1 large egg, room temp
1/2 cup plain Greek yogurt
1 tsp vanilla extract
2 very ripe bananas
1 cup flour
1/2 tsp baking soda
1/4 tsp salt

Frosting-
1/4 cup milk
1/2 vanilla bean
1.25 tbsp flour (that's 1 tbsp and 3/4 tsp)
1/4 tsp vanilla extract
1/2 cup butter, softened
1/4 cup sugar


Directions:

1. Preheat oven to 350º. Grease a 8 x 8 pan.
2. For the cake: In a large bowl, cream butter and sugar, until pale and creamy. Beat in egg. Beat in Greek yogurt. Beat in vanilla. Beat in soft bananas. In a separate bowl, whisk together the flour, baking soda, and salt. Add flour mixture to banana mixture, mix until well combined. Pour batter evenly into greased pan. Bake in pre-heated oven 20-25 minutes, or until toothpick comes out clean. Remove from oven, and let cool completely before frosting.
3. For the frosting: Add milk to a small saucepan. Cut vanilla bean in half lengthwise, and scrape seeds into the milk. Add vanilla bean to milk. Heat over medium heat, until small bubbles appear around the edges of the milk. Remove from heat, and let milk sit for 15 minutes. Discard vanilla bean. Add flour to the milk, and heat over medium-high heat, stirring constantly until mixture becomes thick. Stir in the vanilla extract. Remove from heat, and let completely cool. In a large bowl, cream butter and sugar until very pale and creamy (take your time on this, because you don't want your frosting to be grainy from unincorporated sugar). Add flour mixture to the butter mixture, and beat until frosting takes on texture of whip cream (about 5-7 minutes). Chill in fridge for 15 minutes before frosting.
4. Remove cake from the pan. Spread frosting on top the cake. Store cake in the fridge, since the frosting is milk based.

Recipe adapted from ButterYum

Wednesday, April 24, 2013

New Playlist: 4/24/13

Summer is upon us! I love this time of year, when the flowers are blooming, the sun smiles down on us, and you can actually picture getting into that bikini again. It's a panic-inducing moment, yes, but that's when the real motivation kicks in.

Winter is hard for me, because swimsuit weather seems so far away. I'm a short-term goal, instant-reward kind of girl, so this is the time of year when I'm finally able to kick it into high gear. And what helps me more than a new playlist? Not a whole lot. Good stuff, my friends, good stuff.

This is a great cardio list. It's a little bit longer, my workouts tend to get longer when bikinis are on my mind. And short shorts. And tank tops. And sun-dresses. Bass lines get my heart pumpin', and my ass in gear!

Workout Playlist #9


Well, guess where I am headed now? :)

Happy Hump Day friends!

Sunday, April 21, 2013

Weekend Wrap-up: 4/21/13

Spring is in full bloom!

Pretty tree in our yard.

The traditional Red Velvet Cupcakes for my mother-in-law's birthday.

Bros.

What Gizmo has 99% of the time- the Blue Monkey :)

Me and the Giz.

Couponing haul for 4/21/13.

One of the hubby's crafty projects- A non-headboard headboard.

New products I'm currently testing.

Fun, purple Springtime pedi.

Friday, April 19, 2013

Product Review: VS Makeup Shimmer Eye Shadow in No Limits and More

I've got quite a few new products in my arsenal that I've tried recently, but these 3 today are the ones I'm most excited about. They're all Victoria Secret products, which I normally don't buy. Usually when I'm buying at Victoria Secret, many things take priority over their makeup. You know, skivvies, jammies, sweats, tanks, tees, etc. However, this time I couldn't resist. I had to try a few products. Plus, I had a couple of rewards cards and promotion codes to use, so I got these for a good price :)

1. VS Makeup Shimmer Eye Shadow in No Limits
It's really hard to pick out eyeshadow online! You can never tell if what looks taupe is actually copper, if what looks like shimmer is glitter with fall-out potential, or what the actual texture of the eyeshadow will be. I took a chance on this one, and I am pleased. This is a true taupe shadow, with fine shimmer, and a very blend-able texture. I'm a connoisseur of taupes, you could say. I hoard taupes like there is no tomorrow. In fact, if there were no tomorrow, I would have enough taupe to last someone for a couple of years. I get my hands on every version possible. My holy grail of taupe was previously from Urban Decay's Naked Palette, being "Side Car". The color was perfect, and it was the reason I kept wearing it. However, the glitter fall-out was huge. I just dealt with it. This VS eyeshadow just may take its place, though. It's just the right shade of brown (no coppery tones), the shimmer is pretty, and there is no fall-out. I love it. I always layer my shadow over a cream shadow, and I've noticed I can get 8-10 hours out of this shadow before it starts to fade. There's also no creasing, another bonus! The verdict? I will buy this shade again, and I would purchase this shadow in other colors.

2. VS Pro Lasting FX Eye Shadow Primer


I was a little nervous about trying this product, the reviews were hit and miss. Some people hated it, in fact. I decided to try it anyway. I'm quite pleased with this product. My main concern is longevity in my makeup, as the makeup I buy is quite pigmented. No complaints with the pigmentation of my products layered over this primer however, it's a great product for playing up the intensity of a product. What I was impressed with was how long my eyeshadow stays without fading or creasing. I loathe creasing. It's near the top of my list of makeup pet peeves, along with mascara goopies and foundation oxidizing to a color not found in nature. I judge all eyeshadows and primers by creasing. I have no creasing when I use this product, though. That aspect alone makes this product worth it for me. The verdict? Yes, I would purchase this again.

3. VS Makeup Hypergloss Eye Shimmer
Oh, I saved the best for last! I'm in love with this product. I bought this in "Soft Gold Lights" because the silver was on back-order. I was a little nervous to try it. I heard the word "gloss" in the product name, and kind of had this picture in my head of lip gloss on my eyelids. It was a gloopy, creasy, nightmare image. Luckily, actually using this product couldn't be further from that. The tube is pretty small, but you only need an amount the size of a pin head for each eye. The formula is extremely blend-able, which is why you only need the tiniest amount. It goes a long way. I applied mine over my shimmer eyeshadow, and it really does highlight the color of your eyeshadow (rather than turning your eyeshadow the color of the gloss). I took a step back after applying it, and looked at the effect in the mirror. It really does make your eyes look shiny, in a good way. The next thing I was worried about was, of course, creasing. Nope! I checked on my makeup every couple of hours, for about 10 hours. No creasing. No fading. I'm hooked! The verdict? I'm really hoping they don't discontinue this, because it's already become a staple in my makeup bag. I may have to stockpile it, just in case they do discontinue it.

Happy Friday everyone! I hope you all have a great weekend!

Wednesday, April 17, 2013

Vanilla Bean Custard Bars


Yesterday was the mother-in-law's birthday! Of course, she wants the traditional Red Velvet Cupcakes, but since the rest of the family can't get together until Friday, cupcakes will have to wait until Friday. But it's not someone's birthday without a sweet treat!

Last week, I ran out of flour. This turned out to be a good thing. As I was scouring my baking cupboard for any kind of flour, I found the mother-load of vanilla beans. I bought two 4-packs at Costco in January that I had forgotten about. As any baker will tell you, vanilla beans are the holy grail. It's like that moment on TV or in a movie when the hero/heroine finds the treasure, and there's light emanating from the treasure with that corny music playing in the background. That's what finding the vanilla beans was like for me. I immediately began scheming up a way to use one.

We had the mother-in-law over for dinner last night to celebrate, since we seemed to be the only ones available for her birthday. It worked out well. She's on a low-carb diet right now, so I made BBQ ribs in the crock pot (which, not to brag, were so tender we didn't even use our hands! The meat fell off the bones!), and roasted some broccoli and grape tomatoes. A very low-carb dinner. Until we brought out the cookie bars, that is. The vanilla bean custard is creamy and delicate, and combines deliciously with the chewy sugar cookie base.

Stay tuned for more vanilla bean recipes, because there will be more :)


Ingredients:
Custard-
2 1/4 cups of milk (I used 1%)
1 vanilla bean
2 eggs and 2 egg yolks (that's a total of 4 eggs minus 2 whites)
1/3 cup sugar
1/4 cup cake flour
1/4 cup cornstarch

Cookie Base-
1 3/4 sticks of unsalted butter, softened
1/2 cup sugar
2 eggs, room temperature
1 tbsp vanilla extract
2 1/2 cups flour
1/2 tsp baking powder
1/2 tsp salt

Directions:
1. Put milk in a small pot. Cut vanilla bean in half, and scrape seeds from both sides into the milk. Add scraped vanilla bean pod into the milk. Scald the milk over medium-high heat, until small bubbles appear at the edges of the milk. Remove from heat, and let milk sit for 15 minutes. Discard vanilla bean pod.
2. In a large bowl, beat eggs and eggs yolks until combined. Add sugar, and beat mixture until the mixture turns almost white (about 5-7 minutes). Add cake flour and cornstarch, and mix well.
3. Add egg mixture to the milk mixture, and heat over medium-high heat. Constantly whisk until mixture begins to thicken. When the mixture has just begun to thicken, remove pan immediately from heat and continue to whisk until mixture is smooth and creamy. Pour custard into a bowl, and place a piece of plastic wrap onto the top of the custard to keep a skin from forming. Chill in fridge.
4. Pre-heat oven to 350º. Grease a 9x13 dish.
5. In a large mixing bowl, combine butter and sugar. Cream butter and sugar until mixture is pale and creamy. Mix in eggs, and beat well. Mix in vanilla, and beat well.
6. Combine flour through salt in a separate bowl. Whisk to combine.
7. In 3 additions, add flour to butter mixture, mixing completely with each addition.
8. Spread dough evenly in the greased pan. Bake in preheated oven 20-25 minutes, or until edges are browned and toothpick comes out clean. Sit pan on a cooling rack, and let pan cool completely. I would suggest putting the base in the freezer for 30 minutes before moving on to the next step.
9. Spread custard over the cookie base. Place whole pan in the freezer, let chill until the custard is firm to the touch (about 1 hour). Cut the pan into 24 bars. Chill in the fridge before serving. Store bars in the fridge.


Tuesday, April 16, 2013

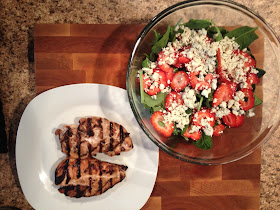
Simple Spinach Salad


Onward and upward in my healthy living/bikini body quest!

I was going to make Spinach and Parmesan Orzo for dinner last night, but after I calculated the calories, I was cursing the website and deciding at the same time not to make the orzo. Stupid caloriecount.com. Anyhoo, I had spinach, which coincidently is an ok-food with caloriecount.com, so I decided to put it to good use. I really should include spinach in my diet more often.

I can't take all the credit for thinking up this recipe. It's actually a variation of a salad that was served at Monday Night dinner's when I was in a sorority at college. That salad was actually spinach, strawberries, red onions, and raspberry vinaigrette. I could eat plate-ful's of that salad. There is no way on Earth I'd be able to get the hubby to eat raw onions, so I put blue cheese in the salad instead of red onions. It was a damn good choice!

The hubby gave it two thumbs up, it's super-easy to make, and it uses ingredients I have on hand a lot (that is, when strawberries are in season). I know I will be making this again :)


Ingredients:
1 (10 oz.) bag of spinach
7-10 strawberries, thinly sliced
1/2 cup of blue cheese crumbles
3 tbsp raspberry vinaigrette

Directions:
1. Toss all ingredients together in a large bowl.
2. Sit back, and read a book or watch a "Friends" episode with all the time you saved making dinner :)

Sunday, April 14, 2013

Sunday Selects

Everyone has been doing a favorites post lately, so I thought I'd jump on the ol' bandwagon. Of course, everyone else got their posts in for "Friday Faves", while I did not. So you have "Sunday Selects". Voila :)

1. Spring!!!


I feel bad rubbing the fact that Spring is here in some of your faces' (ahem, Aunt Marilyn, who just got 10 new inches of snow in Minnesota). However, everything is starting to turn green here, flowers (ok, weeds) are popping up, and we've had some warm, sunny days. I'm not the only one loving it-


Ah, yes. That special time of year when one's dog loves to roll around in the grass, getting who knows what on him. 5 minutes after their bath's. Sigh.

2. The Americans

Image source: IMDB
If you haven't gotten into this fast-paced, highly fascinating show about Russian spies living in America during the Cold War starring former "Felicity" star, Keri Russell, you are missing out. One of the best parts of the show is to watch their (in today's standards, mind you) completely outdated technology. It's so crazy that this stuff was considered high tech just 30 years ago. Man alive, I'm old!

3. Brookside's Dark Chocolate
Image source: Facebook
I'm totally obsessed with these pieces of dark chocolate filled with pomegranate juice. The hubby is going to have to send me to dark chocolate rehab pretty soon :)

4. We've Got Spirit by James T. McElroy

Image source: Amazon
Here's what I'm reading right now, and here's why. This book was written about the cheerleading team where my hubby went to high school, and the county that I'm living in currently. They've won nationals many, many times. So many times, in fact, that someone decided to write a book about them. From what the hubby has told me, people around the county HATE this book, because they think it makes them look bad. I'm finding it pretty accurate so far, and it was written almost 15 years ago. Not my normal-type read, but a good historical account set in where I'm living.

5. Spring Time Baseball Games


Ok, so I've only been to 1 game. It was fantastic though! It was a sunny, 70º day in downtown Cincinnati, with hardly any wind from the river. We got free Red's fleece blankets, and drank beer for a couple of hours with friends in the sun. Does it really get any better than that? I also inhaled a plate of nachos that were piled high with BBQ pulled pork, salsa, jalapenos, cheese, and guacamole. Um, I'll be going back just for the nachos alone, thank you very much!

6. Buxom Buxom Big & Healthy Lip Polish in Amber

Image source: Sephora
Another of my latest obsessions. This slightly plumps your lips, has tons of sparkle, and just a hint of nude color. I'm already on my 2nd tube since October.

7. Miranda Lambert's "Mama's Broken Heart"

Image source: Slack Time
This is currently my go-to workout song. Between the fast beat and Miranda's bad-ass-ness (yep, just made that up), this song really get's my Mojo going. I love, love, LOVE Miranda Lambert. Every song she does is perfect. I can't remember the last song that she released that I haven't bought. I really should just buy her albums :)

I hope everyone had a fantastic weekend!

Friday, April 12, 2013

Cooking Light This Spring: 2013

Image Source: Cooking Light
Cooking Light is one of those things that arrives in my mailbox, and 5 minutes later it's sitting on the side table of my couch with 30 dog-eared pages in it. The tacos on the cover didn't help with my over-eagerness to get into that magazine.

I read the magazine very oddly. I flip quickly through the whole magazine 1 time. My 2nd browsing of the magazine takes a little bit longer as I dog-ear the recipes I want to try. The 3rd time around, I actually stop and read all the articles. It's weird, I know. It may even fall into an OCD category, but that's how I like to read my Cooking Light.

I'm amazed every month at all the inspiration I get. Most of the time, I'm smacking my forehead and wondering 'Why I didn't think of that?'. I've come to terms with the fact that I'm not a revolutionary thinker with my palette. That's ok, recipes were made for people like me :)

What inspired me in this month's issue? Tons!

Grilled Asian Flank Steak with Mango Salad

Chicken Noodle Bowl

Fish Tacos with Tomatillo Sauce

Grilled Chicken and Vegetable Quesadillas

Raspberry Chipotle Chicken Breast with Cucumber Salad

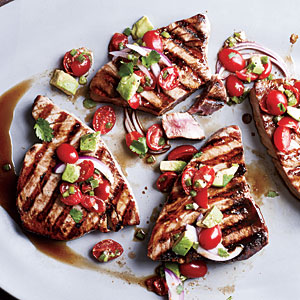
Seared Tuna with Avocado Salsa

Shrimp Fettuccine

Almond Brittle

Chocolate Tacos
You can bet some of these are going to show up on my menu plan ASAP! Especially those Chocolate Tacos :)

Have a great weekend everyone!

Wednesday, April 10, 2013

Rustic Mini Apple Pies


It's probably not the correct season for apple pie, but guess what?

I don't care! The heart wants what the heart wants. And this kid wanted apple pie.

Actually, I've had 4 apples in my fruit bowl, lonely as hell, for a couple of weeks now. I wanted to do something with them, and apple pie was the first thing that came to mind. It then became a stubborn road block in my mind, as apple pie was the only thing I could think of. I decided (much like Mike) to just do it.

I had one sheet of puff pastry left in the freezer, so I decided to use that as the crust and to make mini pies. What's better than your own personal little pie? Not a lot my friend, not a lot. These might be the new dessert that I make for Christmas or Thanksgiving. They're just so cute!

Don't worry Hubby, I'll still make your pecan pie too :)

Ingredients (Makes 4):

1 sheet puff pastry, slightly thawed
3/4 cup sugar
1/4 cup flour
1 tsp cinnamon
dash of salt
4 apples, skinned and chopped

Crumb topping-

3 tbsp butter, very cold
1/4 cup flour
1/4 cup brown sugar
dash of cinnamon

Directions:

1. Preheat oven to 325º. Spray 4 cups in a jumbo muffin pan with cooking spray. Cut puff pastry sheet into 4 parts. Place cuts of puff pastry into muffin pan, shaping into mini-pies. Poke puff pastry with a fork in several places to help the dough rise evenly. Set pan aside.
2. In a large bowl, combine sugar through salt. Stir in apples. Divide apple topping among 4 mini-pies.
3. In a smaller bowl, combine butter through cinnamon. Cut into mixture, until mixture resembles a coarse crumb. Divide crumb mixture among the 4 pies.
4. Bake in pre-heated oven 25-35 minutes, or until sides of crust are browned and apples are bubbly. Let cool in pan for 1 hour. Remove pies to a cooling rack, cool completely before storage. Serve with whip cream, or ice cream.

*Recipe adapted from: Simple Daily Recipes

Tuesday, April 9, 2013

Springtime Polish Round-Up

I think, I think it's finally spring here in Kentucky. Our weather has been sunny, and 70º for the last couple of days. It's even supposed to be 80º today! I'm so excited, I've been waiting with abated breath for spring. I was soooo sick of wearing boots, or my tennis shoes, or some other version of closed-toed shoes. It's flip-flop time baby!

So being as it is time for flip-flops, what goes hand-in-hand with flip-flops? Pedicures! Time to remove your toes from their sweaty, confined winter prisons, and share them with the world. Go forth ladies, and shed your ashen heels. Moisturize to your hearts content. And for heaven's sake, pick a pretty polish!

I've actually been testing out different polish's all winter. I feel better with my toes painted. Some I've been fond of (hello Covergirl in Smoky Taupe!), and some others I feel, um, not so fond of. Here's some looks I've tried out:

1. Nude


I picked the wrong color of nude. This is Sinful Colors in Vacation Time, and it does not work with my pasty-white complexion. This polish has pink-undertones, and my skin tone was not having it. I'm a big fan of the nude look, I just haven't picked out the right color yet. With so many nudes to choose from, it might be awhile before I find the right one. Besides why not pick a color that people don't have to squint at, and tilt their head as they ponder if you're even wearing a polish? :)

2. Sparkly White


I actually really liked the sparkly white polish. Think disco nails, rather than toes covered in white-out. I bought the Nicole by OPI in It's All About The Glam, and tried it by itself in 3 coats. However, it produced more of a transparent finish rather than the solid, glittery white I was coveting. I countered this by applying Maybelline's Porcelain Party first, which is a non-translucent white. I finished the look with 2 coats of the OPI polish. The 2 polish's together combined for the more opaque look I was going for. It was a really pretty pedicure, one I'm likely to repeat.

3. Bold Purple


As many of you may know, I heart purple. Love, love, LOVE it. I've probably tried just about every purple out on the market. This was a non-complicated pedicure, and 2 coats of this thick polish will produce a perfectly opaque pedicure. Whilst the color was a complete winner (the color was Paparazzi Pleaser), L'Oreal's polish formula sucks. It was too thick, and globby (yes, that is a perfectly acceptable made-up word for describing a nail polish). It chipped and smudged immediately (and yes, I did let the polish set for 60 minutes before it smudged). You can guarantee you'll see me in another purple pedicure, however you are unlikely to see me purchasing another L'Oreal nail polish.

So, what's next? I got some polish strips I'm going to try. I love polish strips. They always look perfect, and they last forever! I got some China Glaze strips on sale at Sally's, and I'm super-excited for my next look.


And what do you know? They are gonna be purple :)

Thursday, April 4, 2013

Mediterranean Cannelli Bean Salad Over Roasted Red Potatoes


We've got detox going on over at this house.

After 2 weeks of, umm... robust eating, the hubby and I are eating healthfully this week. Well, healthfully until we go out to dinner tonight. And I make cookies this afternoon for my brother's birthday :)

This salad fits the bill! It's an excellent and delicious source of fiber, iron, potassium, Vitamin A, and Vitamin C. It's also low in saturated fat. Why not have this fresh, healthy salad for dinner? I served this over roasted red potatoes, but it could be served over pasta or rice. Or as a side dish with chicken or fish.

An added bonus? As healthy as this salad is, the picky hubby still loved it :)

Ingredients:

1 bunch asparagus, trimmed and cut in half
6 oz grape tomatoes
2 tsp olive oil, divided
1 tsp garlic powder
kosher salt and fresh-cracked pepper
1 (15)oz can of cannellini beans, drained and rinsed
3 garlic cloves minced
3 cups romaine lettuce, chopped
1/4 cup of parsley, minced
1 tbsp lemon juice

Directions:

1. Preheat oven to 425º. Coat a cookie sheet lightly with cooking spray.
2. In a large bowl, combine asparagus, grape tomatoes, 1 tsp olive oil, and garlic powder. Toss well to combine. Arrange in a single layer on prepared cookie sheet. Season lightly with kosher salt and pepper. Roast in pre-heated oven 8-10 minutes, or until asparagus is tender and tomatoes have just barely burst. Remove from oven and let cool slightly.
3. In a skillet, heat remaining 1 tsp olive oil over medium-high heat. When heated, add garlic. Cook until garlic is toasted, about 1 minute. Add beans to the pan, saute 1-2 minutes or until beans are heated. Remove from heat.
4. In a large bowl, add romaine and parsley. Add slightly cooled asparagus and tomatoes. Add beans and olive oil. Drizzle lemon juice over salad. Toss to combine. Serve immediately.

I never really found a recipe to adapt this from, but my inspiration came from this picture on Pinterest :)